


Scripts grew up in 0.13.0. A .zcmd script was already a part written as text; now one can open with a few input lines, and pressing Run shows a panel of fields — Module, Teeth, Bore — before anything is drawn. That is an add-in, and the first one, a spur gear, ships in a library you open from the Scripts panel. The library is not baked into the app: it is read from a public GitHub repo, zenve3d/zenve3d-scripts, so a merged pull request shows up on every iPad, Mac and browser within minutes. No release, no update, no account needed to browse it.
What a script is, and what an add-in adds
A script is a .zcmd file: one command per line, every dimension an expression, the whole thing replayed by the engine into real sketches, constraints and features (the format has its own post). Since 0.11.2 the Scripts panel (⌘4) keeps your scripts by name, and any of them runs into the open project — a NEMA 17 lands beside the bracket you were drawing, as a new part with its own parameters.
An add-in is a script that asks first. One line per value:
input length diameter = "60"  label "Diameter"
input int    holes    = "6"   label "Holes"
input length hole     = "3.4" label "Hole" choice "2.4" "3.4" "4.5"
input toggle chamfer  = "1"   label "Chamfer edges"
Five kinds — length, angle, number, int, toggle — a default, an optional label, and an optional list of choices. Run opens a panel with one field per line, prefilled with the defaults; Finish runs the script with what you typed; Cancel changes nothing. A script with no value lines runs straight away, exactly as before.
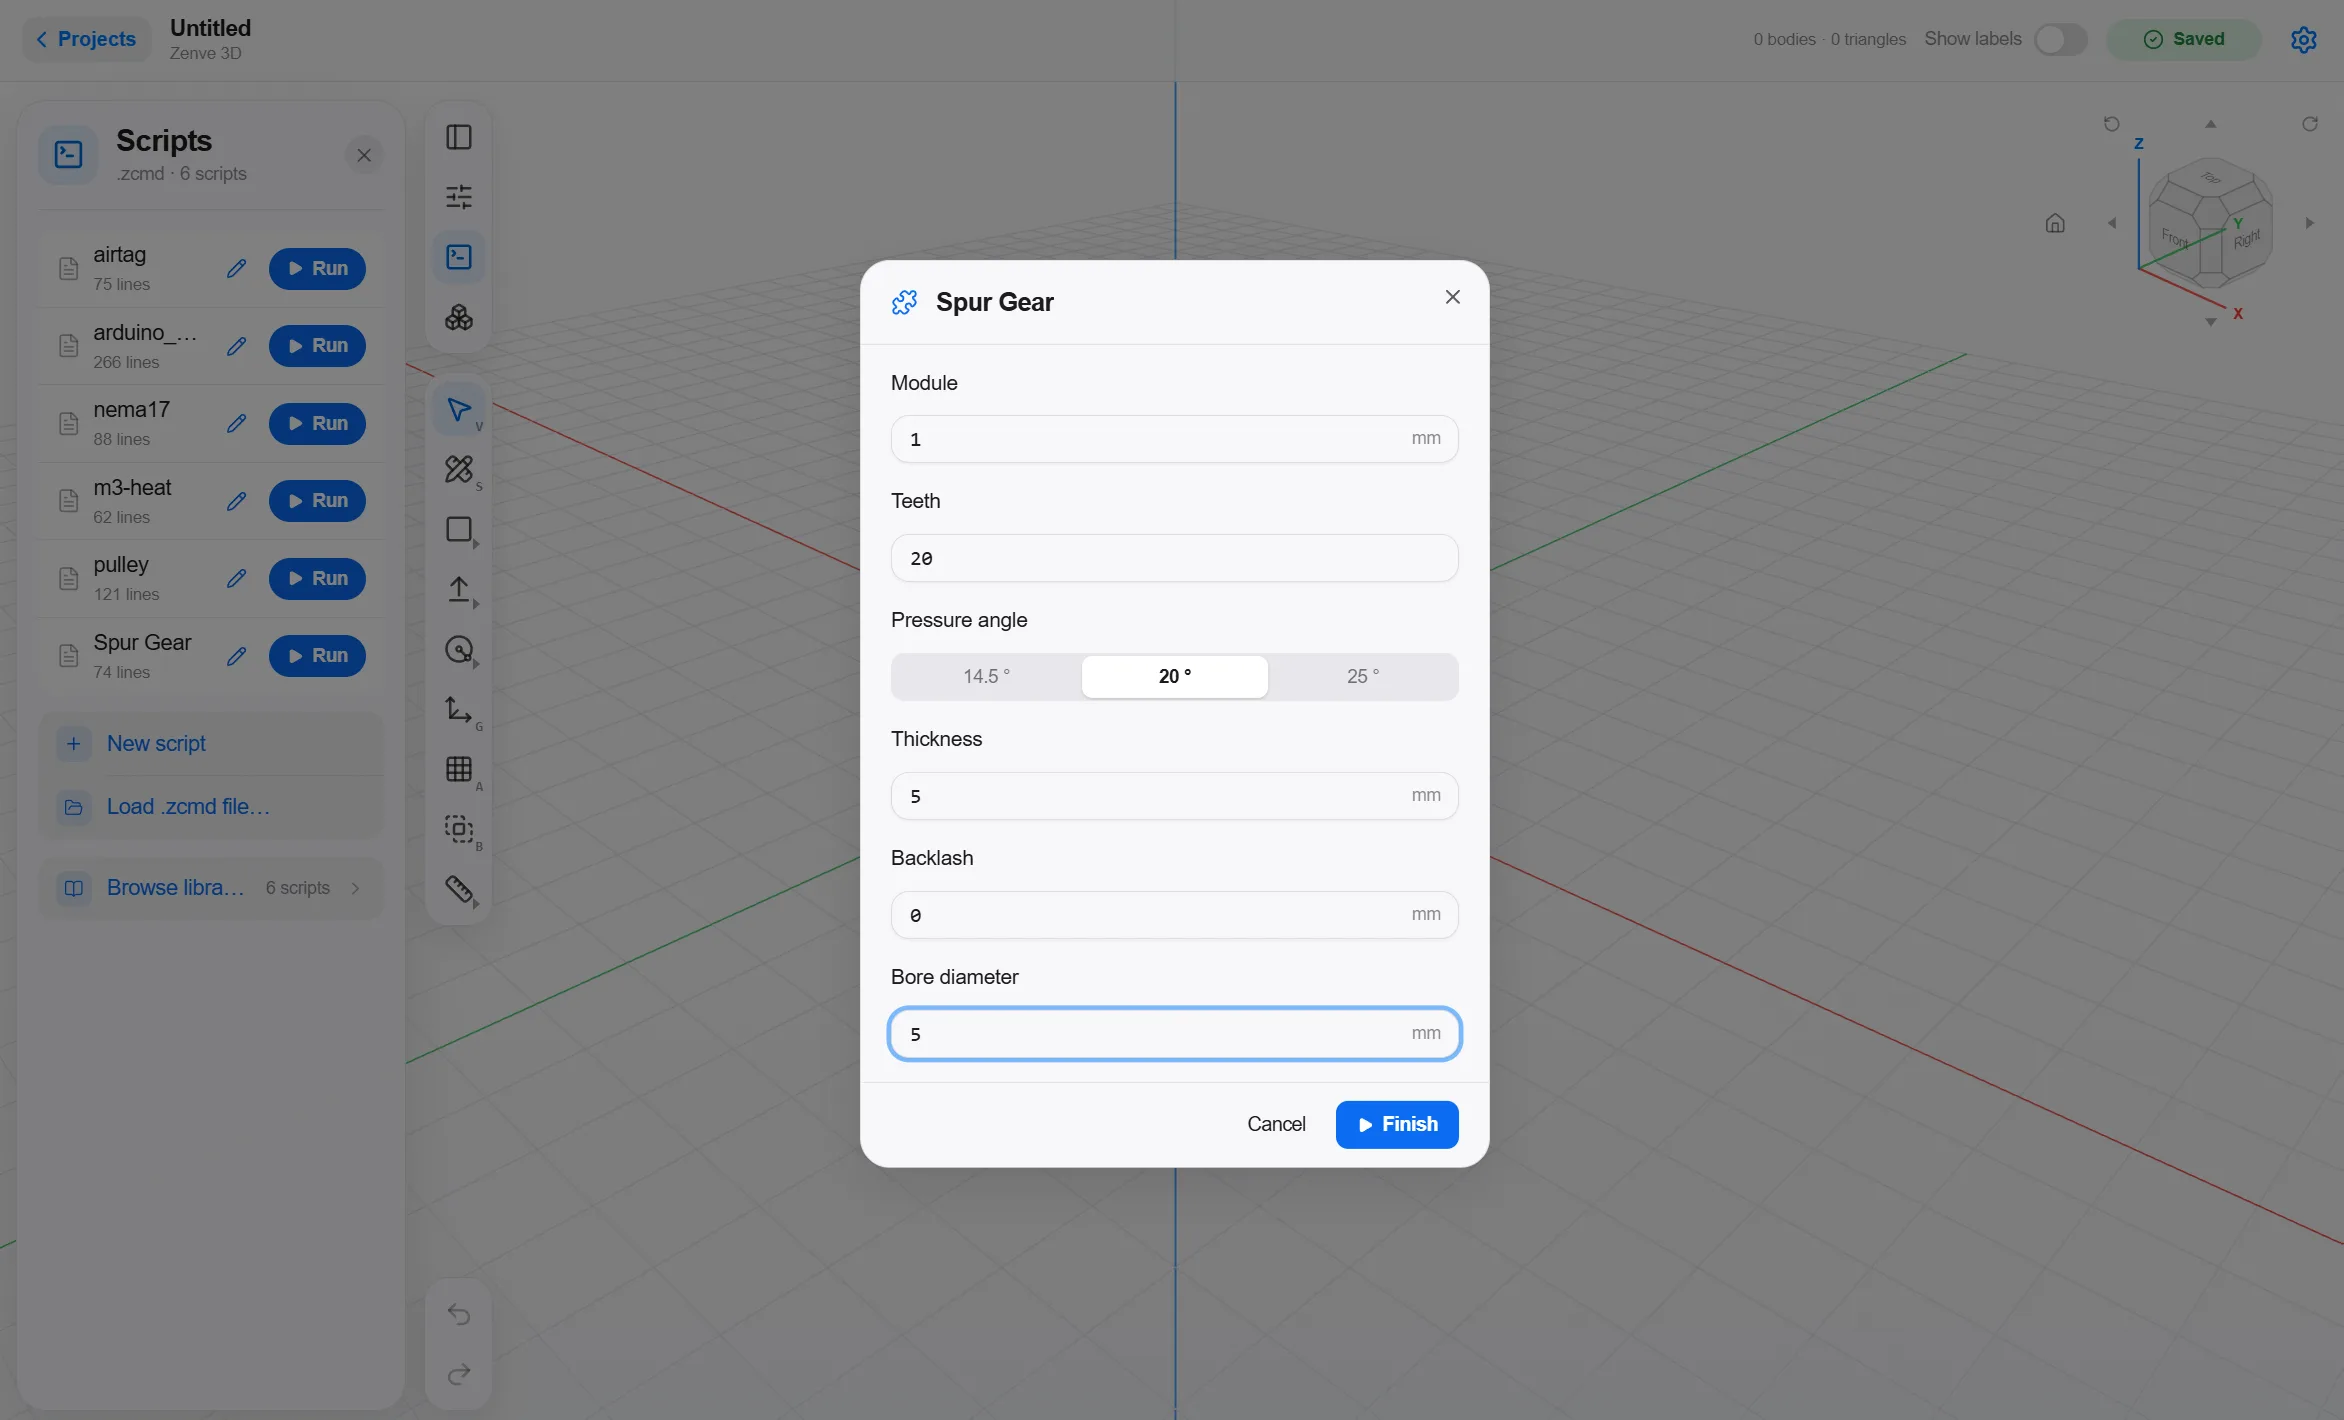
The design decision that matters: an input line is a param line. The value you type is not consumed and thrown away — it becomes a parameter in your Parameters panel, and every expression in the script reads it by name. Change teeth from 20 to 36 a week later and the gear reshapes, because the gear was never a frozen shape; it was a recipe over that number.
How to use the library
- Open the Scripts panel and tap Browse library.
- Search, or filter with All / Parts / Add-ins.
- Run draws it into the open project. A part draws immediately; an add-in shows its panel first.
- Duplicate copies the script into your own list so you can read it and edit it.
Today the library holds four parts — a NEMA 17 stepper, a GT2 20-tooth pulley, an M3 heat-set insert boss, an Arduino Uno R3 — and two add-ins, a flange and the spur gear. Browsing and running need no account.
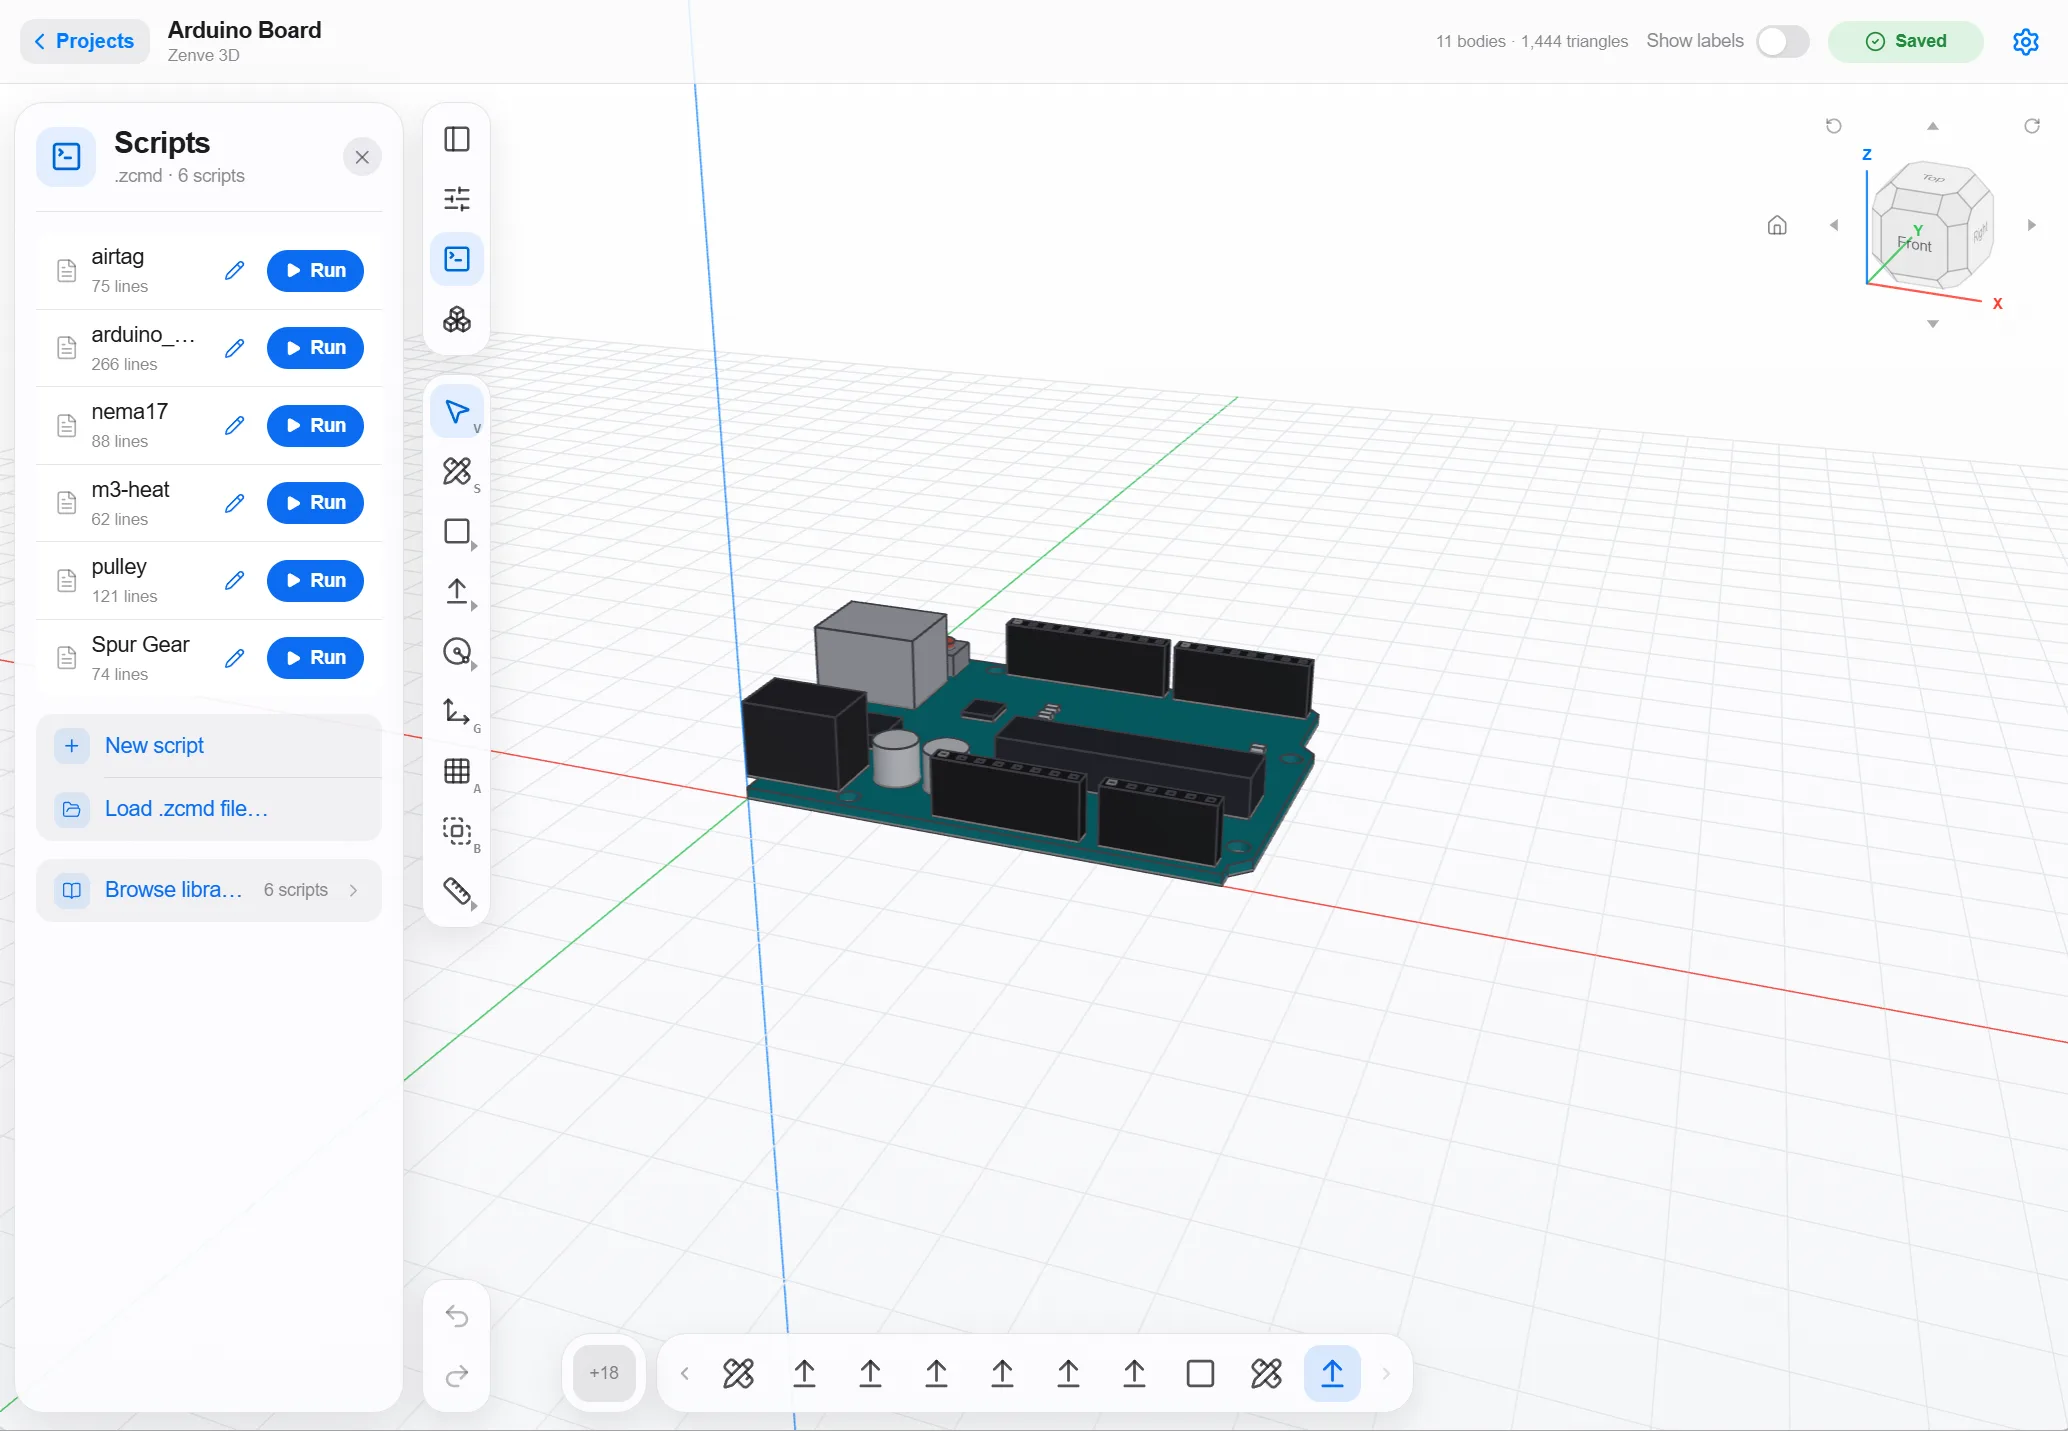
A part like the Uno is a reference body: you don't print it, you design around it. Run it, then sketch your enclosure on the XY plane and cut the standoffs and port openings against the board's own bodies — each component is its own body, so a cut against the USB jack leaves the PCB alone. Keeping your own scripts does: a free account holds one, and a signed-out builder has no Scripts tile at all.
Example: a flange with a bolt circle
Goal: a round mounting plate, 60 mm across, six M3 clearance holes on a 45 mm circle.
Browse library ▸ Add-ins ▸ Flange ▸ Run. The panel asks for Diameter, Bore, Bolt circle, Holes, Hole (a choice of M2–M5 clearance sizes) and Thickness. Finish.
What you get is not six holes — it is one hole cut on the bolt circle and a circular pattern that repeats it holes times. Set flange1_holes to 8 in the Parameters panel and the pattern recounts. Set flange1_bolt to 50 and the ring widens. The script is thirty-two lines; Duplicate it and read it, it is the clearest small example of the shape every add-in takes.
Example: two gears that mesh
Goal: a 20-tooth drive gear and a 40-tooth driven gear, 2:1.
Run Spur Gear with Teeth 20, module 1, 20° pressure angle, Finish. Run it again with Teeth 40, Finish. You now have gear1_teeth and gear2_teeth in the Parameters panel, independent of each other — every run of an add-in is a fresh instance under its own prefix. Two gears of the same module and pressure angle mesh at a centre distance of module * (z1 + z2) / 2, so 1 * (20 + 40) / 2 = 30 mm: move the second part 30 mm along X and they mesh.
The gear's tooth is worth a look if you duplicate the script. Every point of the involute flank is placed by a formula — ("tip_r * cos(end_a)", "tip_r * sin(end_a)") — rather than tapped and constrained, which is what makes the tooth reshape when module or pressure changes later. One cubic per flank, within microns of the true involute, far below what a printer resolves.
Example: writing your own — a standoff tool
Goal: a tool you keep: select a face, run, get a screw standoff joined onto it, with its height and diameter asked for.
zcmd 1
# Select a face, then run: a standoff with a screw hole, joined onto it.
prefix standoff
input face $top
input body $base
input length height   = "6"   label "Height"
input length diameter = "8"   label "Diameter"
input length hole     = "2.5" label "Screw hole" choice "2.5" "3.4"
sketch on $top                                    -> $s $o
circle $s at (10, 10) radius "diameter / 2"       -> $op $oc $or
circle $s at (10, 10) radius "hole / 2"           -> $ip $ic $ir
constrain $s coincident $op $ip
extrude profile($s, 0) distance "height" join $base -> $boss $d
Two kinds of input mixed in one script. input face $top and input body $base bind from what you had selected when you pressed Run — tap a flat face under Select and the Face panel's Run Script… offers the face and its body both. The three value lines open the panel. prefix standoff names each run's parameters standoff1_height, standoff2_height, so four standoffs on one lid are four independent heights. New script in the Scripts panel, paste, Save — it is yours from then on.
Why it reads from GitHub
The library could have been a folder inside the app. It is a JSON index in a public repo instead, and the api serves that index to the clients (the clients never talk to GitHub themselves, so nothing breaks when a rate limit does). The reason is who gets to add to it. A part someone measured from a real motor, a fixture someone printed ten times, an add-in that draws a thing you'd otherwise draw every week — those come from makers, not from a release schedule. Merging a PR is publishing. The whole process is one page, CONTRIBUTING.md: build it in the app first, keep it parametric, say where the dimensions came from, one script per PR.
The same idea runs the other way too. Any project can be made public from its menu (iPad, Mac and web), and public projects are listed at app.zenve3d.com/public — anyone views them read-only in the browser and can fork one into their own library. A script is a part as text; a public project is a part as a link. Either way the thing that travels is the recipe, parameters and all, never a mesh.
Honest limits
- A value is always a number. There is no text kind, and no
if— a toggle is0or1, used arithmetically ("thickness + lid * 2"grows by 2 mm whenlidis on). - Add-ins need 0.13.0. The library lists them to older builds too, whose engine refuses the
input … =line. - A hand-written add-in has the trap every script has: face and region indices come from the engine, not the text. The flange and the gear take
profile($s, 0)on faith only because each sketch holds a known loop; anything richer should be run in the app and read back, as the agent loop does. - A free account keeps one script of its own. Duplicating from the library counts.
- The library has no categories yet, just search and the Parts / Add-ins split; it is sized for about a hundred entries.
What's next
The two things the library already has room for: tags in library.json, so the browser can grow category chips when the list outgrows search, and a minimum-engine field per entry, so an add-in that needs a newer build is hidden from an older one instead of refusing. Both wait on the repo filling up — which is the part that is now yours.